
How To Build A Wooden Wheelchair Ramp
Affiliate Disclosure
As an Amazon Associate, we earn from qualifying purchases at no additional cost to you. This helps us maintain the site and provide honest product reviews.
How about making a wheelchair ramp as an unusual DIY project, sound good, right?
Building a wheelchair ramp is a simple project that can help sharpen your mind and make you a bit more independent. It can also be difficult if you don’t have the right tools or have no idea about basic construction.
No matter your needs or condition, I think it’s a great idea to learn how to build a wheelchair ramp. It doesn’t matter if you are in a wheelchair or not; building a wheelchair ramp is a fun project that is easy to learn.
In this article, I will give you a step-by-step guide on how to build a wheelchair ramp. We’ll also take time to look at some of the most important materials that you need to make a perfect wheelchair ramp.
Table of Contents
ADA Wheelchair Ramp Requirements
Before we give you the step-by-step process you need to build a wheelchair ramp, you need to understand the requirements and guidelines stated by the ADA.
Even if your ramp is a DIY project, it is better to use the requirements provided by the Americans with Disabilities Act (ADA).
ADA Specifications For The Wheelchair Ramps
ADA recommended ramp layouts are safer for all wheelchair users, people with strollers, scooters, bikes, and other mobility aids.
Here are some of the most requirements provided by the Americans with Disabilities Act (ADA).
1. As stated by the ADA, every wheelchair ramp may have a maximum slope of 1:12.
That is one inch of vertical rise for every 12 inches of horizontal length. If the 1:12 ratio is too steep for some people to use, the ADA recommends a lower slope of 1:16 to 1:20.
If you use any of these measurements, the ramp will not be steep and easier to climb whether you use a manual wheelchair or power chair.
Depending on the slope and surface of the material you used to build the ramp, you may have to add some extra anti-slip texture to help prevent slipping when using the ramp.
2. Only use Anti-slip agents when the ramp is too steep. The ramp slip-resistant will provide more traction and make it easier for wheelchair users to go up and down on their own.
3. Every ramp must be at least 36” wide and the edges must be protected to secure all the users of the equipment from slipping off.
4. If the ramp is higher than 6 inches or over 72 inches long, it must have handrails on both sides.
5. All ramps must have a level landing above and beneath the equipment. The landing must be as wide [at least five feet square and 60 inches long].
If you are building a ramp for personal use, you are not mandated to conform to ADA standards. For best results, I’d advise you to use the guidelines provided by the ADA.
What Do I Need To Build A Wheelchair Ramp?
Yea, before we show you how to build a wheelchair ramp in your backyard, you must see a list of materials you need to make one on your own.
Since wooden ramps are easier and a tad inexpensive to build, this guide will walk you through everything you need to make a fully-functional wooden wheelchair ramp.
If you want to build a metal ramp, don’t worry, I promise to drop a guide on that later on.
Here’s a list of equipment and materials you’d need to construct a fully-functional wheelchair ramp on your own.
1. Pressure-treated wood
Since we are building a wooden ramp, we will use planks, preferably PT planks. Pressure-treated (PT) planks are the best types of wood for making a wheelchair ramp.
These types of wood have been treated with several chemicals and preservatives to promote longevity, protect the wood from rot, and deter wood-boring insects.
Whether you are building the ramp for indoor or outdoor use, pressure-treated wood is the best material to use if you are making the ramp out of wood.
2. Plywood
You need a pressure-treated plank to build the frame and support of the ramp, but for the surface, you’ll need a plywood board. I recommend plywood over other types of wood because they are lighter, durable, and easy to work with.
3. Chop Saw
You’ll also need a chop saw or miter saw if you plan on building a wheelchair ramp. You’ll need this machine to cut the wood. It’s easy to use, just place the plank on a support table and the blade will cut it at a 90-degree angle.
4. Glue
I’ll always advise beginners to use glue to make their ramp before nailing it tight. If it’s your first time building a ramp, use glue to hold all the edges so you can easily adjust the joinery if it doesn’t look good.
I recommend that you use polyvinyl acetate glue (PVA). It is one of the most popular synthetic adhesives for woodworking. What I like the most about PVA is the fact that it is colorless and odorless, so you don’t have to worry if you have allergies.
PVA also dries quickly at room temperature.
5. Galvanized Nails
Unlike other types of nails, galvanized nails are steel nails coated with zinc, which makes them excellent at withstanding rust. I recommend galvanized nails not just because they have excellent rust-resistant properties but also because they are also durable and ease of use.
6. Gloves
Whether you are a pro or beginner, always wear a glove even though you are building a small ramp. Gloves protect your hands from splinters, lacerations, and other injuries that may incur during the construction process.
7. Framing Nailer or Nail Gun
With a framing nailer, you can complete your ramp within minutes. They are great at wood joinery and creating decks. Besides, using a nail gun is easier than using a nail and hammer.
Typically nails between 1/2 inches and 4 inches are used with framing nail gun. You should also get a finishing nailer, just in case you need one for finishing or designing your ramp.
8. Power Drill
You’ll also need a power drill to build a DIY wheelchair ramp. You need a drill to bore holes on the plywood board and the ramp support before screwing the plywood board to the ramp support.
9. Screw
I use nails to hold the support and frame of my ramp, but always use a screw to hold the plywood board to the frame. This way, I can always change the plywood board whenever it is weak.
Once you use your power drill to make holes in the plywood board and ramp support, use a screwdriver or ratcheting screwdriver to insert the screws into the holes in your drill.
10. Measuring instruments
You’ll need a tape measure, builder’s level, and inclinometer/clinometers to measure the length, elevation, and slope of your ramp. Don’t be overwhelmed by their names or what function; they are all easy to use.
11. Marker
To make your ramp look as professional as possible, use a pencil, erasable marker, or chalk to take measurements before you cut or nail anything.
12. Belt sander
A belt sander is perfect for finishing rough edges and smoothing out the ramp for use. This tool helps give your ramp a fine curve, contours, and professional look.
13. Shims
Finally, you may also need shims to construct a functional wheelchair ramp. Shims are used to make a tapered wedge and frames.
Since we will not be adding handrails to the ramp, we will use shims to ensure that the wheelchair is always on the ramp and doesn’t fall off.
If you’re not good with construction or would like to make your kids tag along in the project, you can use simpler construction tools like a hammer, pliers, nails, saw, sandpaper, and a crowbar.
You don’t need all 13 equipment and materials listed above to build a ramp, you only need a sharp mind and skilled hands to make a functional wheelchair ramp.
Don’t let the idea of building a ramp scare you just because you are wheelchair-bound or know nothing about construction.
Now that we have a list of materials you need to build a DIY wheelchair ramp, let’s give you the complete guide on how you can build your wheelchair ramp.
Best Guide To Make A Wheelchair Ramp
Like I said earlier, I’d like to show you the easiest way to build a fully functional wheelchair ramp and I hope to keep my promise.
I assure you that the contents on this page outline the easiest ways to build a wheelchair ramp. You won’t find any guide that will outline the process as easy as we did.
The steps needed to build a wheelchair ramp have been broken down into 5 baby steps.
Now that the air is clear, this is how you make a ramp like a pro.
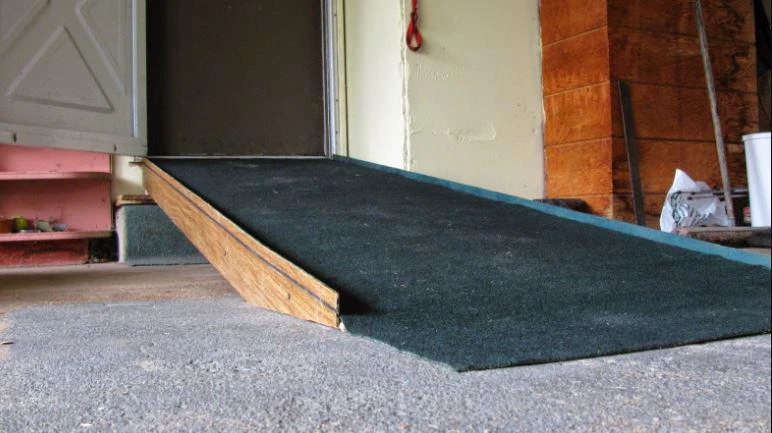
1. Prep the Platform
Preparing the platform is the first and most important step to complete before you can successfully make a wheelchair ramp. Your ramp will be made of pressure-treated wood and led together with galvanized roofing nails.
The platform of the ramp is the total area of the ramp. You start by creating a mental picture of what you want in your head. If it’s hard to picture the ramp in your head, you can draw the plans on a whiteboard or with AutoCAD on your PC.
You can use any measurement of your choice, depending on how long to want the ramp to be. However, the Americans with Disabilities Act (ADA) recommended measurement for a wheelchair ramp is 5 ft x 5 ft.
The reason 5x5ft was recommended by the ADA is that ramps of these sizes are wide enough to perform a 360° turn with ease. These sizes of ramps are perfect for porches, stairs, and stairs.
2. Build The Frame
The frame of the ramp is the skeletal system of the whole thing. You need to build the frame before you do anything else.
You will need four 2×4 pressure-treated planks. Two of these planks would be 5-foot long and the remaining two would be 8-foot long each.
The reason we are using two different sizes is that we are making a rectangular wheelchair ramp.
Rectangular ramps have more stability and support than square ramps.
Place the longer planks opposite each other and the shorter ramps opposite each other. Use glue to hold each end of the frame using a basic butt wood joinery.
3. Position The Frames
Once you’ve built the frame, it’s better to test what you’ve done so far before making any other adjustments. Put one higher end of the frame around the edge of the doorway and the lower end on the floor.
If you’ve made any mistakes, you can simply adjust the joinery placement and glue it again. Once you’re satisfied with the results, use your framing nailer to seal the deal.
Once each end of the frame is nailed, it will become firmer, stronger, and almost ready for use.
4. Place The Support Beam On The Frame
Now, let us move to make an excellent support system for the ramp. Since the frame of the ramp is the skeletal system, the support beam acts like the muscles of the ramp.
Support beams are basically 2×2 planks of wood placed over the frame of the ramp to separate the frame from the surface.
You can create support by measuring the distance from the door to the concrete base of the ramp. Using this measurement, cut three 2×2 planks and nail them on the frame of the ramp.
Once the support beam has been installed on the top of the frame, you can add the plywood board to finish your ramp.
5. Add The Plywood Surface
Since the frame and the support beam of the ramp have been secured, the next step is to add the plywood surface to the ramp. Before you nail the board to the frame, make sure that it’s properly positioned in a way that it is perpendicular to the ramp.
It is important to make sure that the board is perpendicular to the ramp or it will cave in and break when you step in it.
Once it looks good enough, use your power drill to drill holes in the plywood and the support beams so you can screw them together.
Once the holes are in place, screw the plywood surface to the support beam. The recommended distance between each successive screw is five inches.
I recommend screws because if the plywood gets old and weak, you can always unscrew it from the support beam and install a new one. If you nail the plywood to the support, you’ll have to break and rebuild it every time the plywood is weak.
Once all the planks, boards, and nails are perfectly in place, trim off all the rough and sharp edges using a belt sander and add shims to the edges of the ramp.
Voila, your ramp is ready for use.
There are other smarter and faster ways to build a wheelchair ramp, but the steps we used are by far the easiest way to make a wheelchair ramp.


![Best Wheelchair Tires For Outdoor Use [2026 Review]](/images/posts/Best-Outdoor-Wheelchair-Tires.webp)
WHO ARE WE?
Wheelchaired is a proud member of the United Spinal Association and a disability blog dedicated to sharing guides and advice on issues concerning disability, mobility, accessible travel, and personal development.
> Learn MoreComments
No comments yet. Be the first to share your thoughts!