
How To Paint A Wheelchair Like A Pro
Affiliate Disclosure
As an Amazon Associate, we earn from qualifying purchases at no additional cost to you. This helps us maintain the site and provide honest product reviews.
Table of Contents
Painting a wheelchair is one of the most commonly requested projects and, to me, a very personal one. I’m going to take you through the steps I used when I painted mine.
Painting a wheelchair is an important project as people with disabilities deserve to have chairs that look good and fit their personalities.
Preparing a wheelchair for a paint job can be challenging. That’s why we have compiled this wheelchair painting guide to help you started.
We’ve also included a list of painting tools for you to choose from, a detailed guide on how to paint a wheelchair, and everything else that you should know.
A Beginner’s Guide To Painting A Wheelchair
Now, as a disclaimer, this is not a general guide on how to paint any kind of chair. You may paint yours in this way and be successful, but there is no way I can guarantee it will look the same for you.
But continuous practice will definitely lead to perfection.
But if you are ready, this is a step-by-step guide on how to paint your wheelchair like a pro.
1. Prepare The Tools Needed For The Paint Job
Before you attempt to paint your wheelchair, the most important thing that you should do is to have all the tools and equipment needed to disassemble, paint, and reassemble your wheelchair on standby.
You’ll need a set of spanners, pliers, and other equipment in your tool kit set to assemble and reassemble your bike.
This way, you don’t have to drive or Uber to the hardware store every time you need a tool to tighten the wheels or enhance the colors of the paint.
Here’s a handful of tools you’ll need to paint a wheelchair.
- Protective clothing, goggles, a breathing mask, and gloves.
- Spray paints
- Clearcoat or clear lacquer
- Primer
- Complete tool kit set
- Blow dryer or heat gun
- 1,500-grit sandpaper
- Detergent
- Cleaning cloth
- 1mm wire
- Towel or dry rag
- Painter’s tape
- Plain alcohol or grease remover
- Canvas drop cloths, rosin paper, or painter’s foil
Once you have all the required tools, you can prep the area where you would complete the paint job.
2. Prepare Your Work Station
If you decide to paint your wheelchair in your garage, lawn, bathroom, or a nearby parking lot, you need to prepare the area beforehand before you apply any paint.
Wherever you choose to paint your wheelchair is totally up to you. Just remember that your chosen location must be well-ventilated, dust-free, and spacious.
If you choose to repaint your wheelchair indoors, then use canvas drop cloths, rosin paper, or painter’s foil to protect your walls, carpet, or flooring from any unintentional painting.
Once your workstation is prepared, you can begin working on the wheelchair.
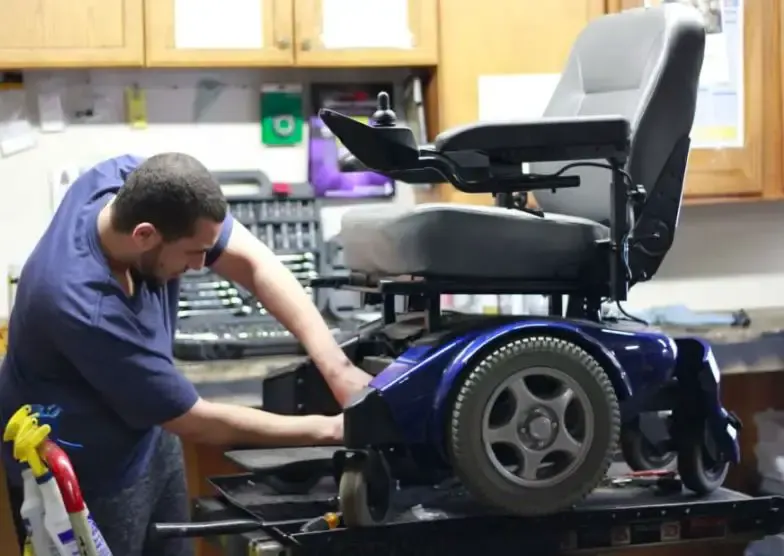
3. Disassemble The Chair
Before you can paint your wheelchair, the first thing you need to do to get started is to disassemble the chair. This makes the paint easier to apply and you get to move the chair to the “perfect” position before and during application.
Wheelchair accessories like the anti-tip bar, castor wheel, brake, seat cushion, cup holders… should be removed; only the frame of the wheelchair and other areas of the chair you wish to paint will be left.
If you use an electric wheelchair or power chair, it’s difficult to disassemble and reassemble the wheelchair. The best approach for you is to mask the area you don’t want to paint with a painter’s foil and hold it down with duct tapes.
4. Remove The Old Paint
If you repaint your wheelchair while the old paint is still one, all your effort will be in vain because the new paint job will last for 8 months at most.
So you must remove the old coating of your wheelchair. If you’ve added any stickers on the chair, you’ll have to scrap it off too.
The easiest way to remove the old paint on your wheelchair is to scrap them off using sandpaper.
If the old paint is too tough to remove using sandpaper, you can loosen up the stiffness using a heat gun or blow dryer. You can also apply plain alcohol or grease remover on the surface to get rid of tougher stains and paints.
Once the old paint has been completely removed, wash the wheelchair with soap & hot water, and polish it with benzine or glass cleaner.
Cleaning the chair with cleaning benzine or glass cleaner would help get rid of excess grease and ensure that the wheelchair is completely clean & ready for repainting.
5. Priming and Painting Your Wheelchair
Now, your wheelchair is all ready to paint. Use a 1mm wire or mounting frame to lift the wheelchair above the ground or place it on an old table.
Wheelchairs are easier to paint when they are not resting on the floor. If you are comfortable painting the wheelchair on the floor, then give it a go.
Once your chair is above the ground, apply a primer. Priming the wheelchair before painting improves the adhesion of the paint which makes it last longer.
Aside from improving the durability, priming the wheelchair also provides additional protection for the wheelchair.
If you don’t apply a primer before you repaint the chair, the paint would eventually peel off especially in humid conditions.
Once you’ve applied the primer, you can begin painting the wheelchair using an airbrush gun or with a spray can. Once you’ve painted all the areas you want to, leave it to dry.
The paint should take approximately 30 minutes to dry.
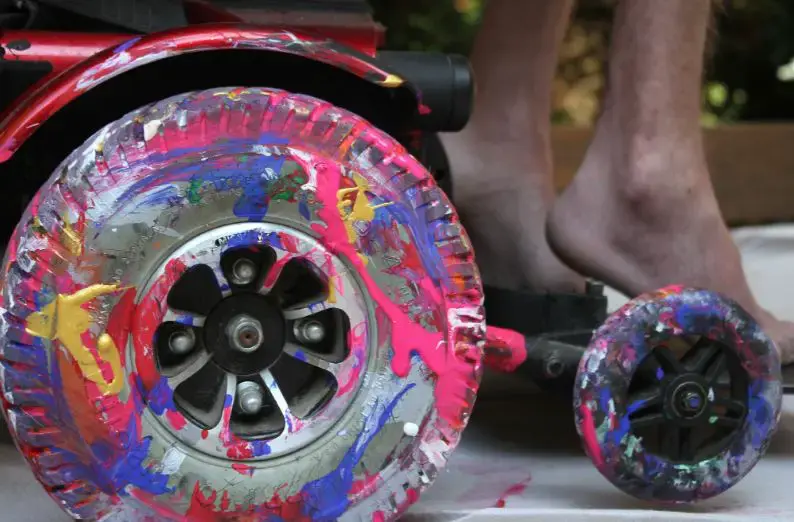
You can use the remaining paint to customize your wheelchair. You can add shapes, letters, abstract figures, or designs of your choice.
Finish up your wheelchair by applying a clear lacquer to make the paint job waterproof and protect the paint from scratches. Make sure you apply the clear lacquer generously [2 to 3 layers] for optimal results.
Leave the chair outside to sundry for 10 hours.
If the paint has completely dried and feels smooth, bring the chair back inside your workstation, reassemble it, and voila; you have a perfectly painted wheelchair.
That’s how to paint a wheelchair like a pro.
While you are at it, you should also consider pumping and polishing your tires or changing the cushion [if necessary] so the entire wheelchair looks and feels brand new.
Painting a wheelchair may seem a pain in the butt, consume a lot of time and energy, but truth be told, it is a fun-filled DIY project you can do alone or compete with a friend, sibling, or partner.
We hope that this short guide has inspired you to repaint, refurbish, and redesign your wheelchair instead of treating it as garbage and leaving a perfectly good wheelchair to go to waste.
Wanna paint your wheelchair? We wish you a great time and an outstanding result. Cheers!


WHO ARE WE?
Wheelchaired is a proud member of the United Spinal Association and a disability blog dedicated to sharing guides and advice on issues concerning disability, mobility, accessible travel, and personal development.
> Learn MoreComments
No comments yet. Be the first to share your thoughts!